Assistant Guide
How to create assistants that help you with recurring tasks and large knowledge
Assistants help you solve recurring tasks quickly and reliably.
In addition, you can equip them with documents that they can access when handling requests.
Distinction:
- Personal Assistants can only be seen by you.
- Company Assistants are available to all users in your company.
- Global Assistants are provided by the AI Workplace team to all users.
1. Where to find the Assistant Builder
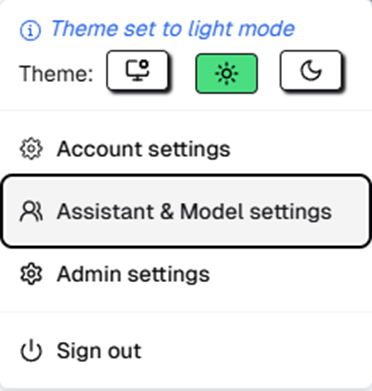
In the AI Workplace, click your name in the bottom left corner.
Open “Assistant & Model settings.”
Click “Add new Personal Assistant.” These assistants are only visible to you.
Alternatively, you can also create a company assistant: select “Company” on the left → “Add new Company Assistant.” These are visible to all company users.
Note: Documents uploaded to a Company Assistant are also accessible to all company users.
2. Creating assistants (most important fields & quick tips)
- Name: Internal name of the assistant (e.g., “HR Guide”).
- Label: Display name in the selection (e.g., “HR Assistant (Beta)”).
- Active state: Active = visible; Inactive = hidden (practical for setup).
- Description: 1–2 sentences describing the purpose (“Answers HR FAQs, links sources”).
- Model for text: Choose text model (if unsure, we recommend Mistral 3.2).
- Model for images: Choose image model (if unsure, we recommend Mistral 3.2).
- Behavior – short rules: Describe language and style, reference sources, ask follow-up questions if unclear.
- System message template: The starting prompt with multiple fixed fields to choose from.
- Welcome message: Greeting & first-step examples with which the assistant opens the conversation.
Click Save assistant.
3. Optional: Add documents (“knowledge”)
Documents that you add to an assistant are available to it for all prompts where the “Use knowledge” button is activated.
Knowledge is like an encyclopedia that the AI can look things up in: it is suitable for questions that have a clear answer in a specific place. For example, rules, guidelines, or price lists.
Example: A product manual for an assistant who is supposed to answer support questions about a product.
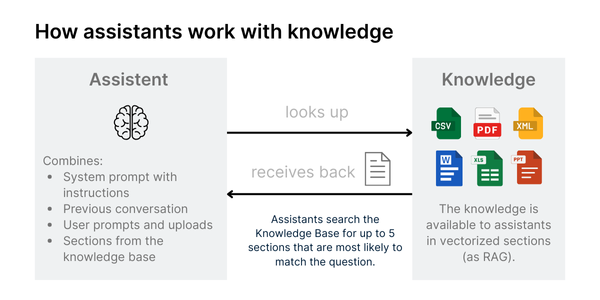
However, there is one thing the assistant cannot do: process all the knowledge it contains (similar to a human being who cannot read through an entire encyclopedia to answer a question). It looks up and finds the most likely matches for your question-it ignores the rest.
Therefore, Knowledge is less suitable for data that needs to be fully considered or processed. It is better to enter such knowledge directly into the assistant's system prompt.
Here are instructions for assigning Knowledge to an assistant:
Open Assistant & Model settings again. Click on ⋯ for the desired assistant → Manage Assistant Knowledge.
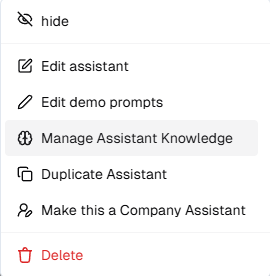
Select Add new Knowledge document and upload files.
- Max. 10 MB per document; split large files if necessary.
- Preferred searchable formats (PDF/Docx).
4. Activate & use assistants
- In chat, top left next to the logo, select the new assistant in the model drop-down.
- Send any chat message (e.g., “Go”) – this starts the assistant.
- Important: The tool "knowledge" in the chat has to be activated to allow the assistant to access its documents.
Tip: Ask test questions and check if the results/tone/sources fit, and refine as needed. Usually, an iterative process is required for assistants to reach their full productivity.
5. Tips for knowledge (documents) in assistants
Documents uploaded to assistants are called “knowledge.” Knowledge can consist of large quantities of documents and is available to assistants as RAG (retrieval-augmented generation). However, due to this type of processing, there are also limitations compared to files that you upload directly in the chat:
- Knowledge can only consist of text. Images and graphics are not recognized. (These must be uploaded separately as image files in the chat.)
- Assistants never use all of the knowledge in the RAG, but search for the parts that best match the question.
- Assistants are therefore better at answering clear questions than abstract and open-ended questions.
- They are more likely to find data that is located in one place in the knowledge base than data that is spread across several locations.
- Prompts that contain more than one question in a row can lead to errors. It is better to proceed in several steps and create different assistants for different tasks.
6. Examples of assistants
The first use cases usually come from everyday tasks involving documents or sensitive data. Ultimately, they depend on your individual work situation.
- Ideas: You'll find inspiration in our guide “20+ Prompts for Every Day,” which can be used to create powerful assistants if the task occurs regularly.
- Existing ones: In addition, there are already some global assistants available that you can use to get started right away. And as soon as administrators in your organization create company assistants, you will also have access to them.
- Copies: You can make a copy of any assistant you didn't create yourself to further customize it for your purposes or attach your own documents.
Overall: Start small, test, and improve. And if in doubt, it's better to set up several assistants. Then you can specialize each assistant for its task and upload only the documents necessary for it.
Further reading:
Updated about 1 month ago